Welding Machine Troubleshooting: Common Problems and Solutions
Welding process is one of the most complex manufacturing processes that needs deep understanding for the factors that are related to base materials and filler materials used, environment changes of pressure, temperature and wind speed, welding machines and related tools that may affect the process. There are a lot of problems of the welder or welding machine that come up during welding and interrupt work progress and consequently decrease welder productivity. Out of these problems, there are many that can be solved by the operator and other cannot be, so the welding operator should have solid background on the common problems that may happen and the solution for each problem, if possible, to save time and decrease work interruption as much as possible.
Before going deep in maintenance routine then in common problems trouble shooting, we should know more about machine duty cycle and some components name and place to have some basics to deal with our welder.
Machine components
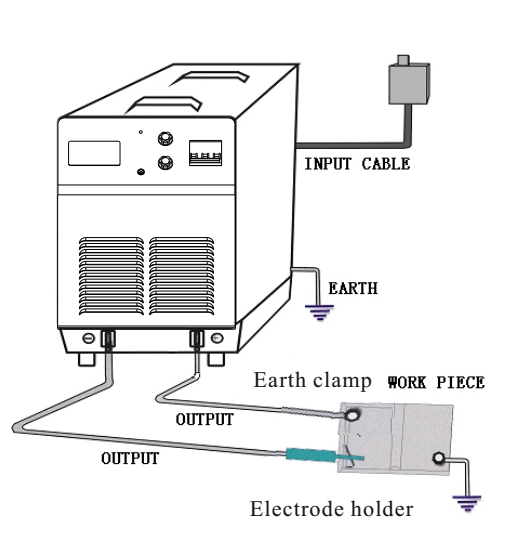
You should have some basics about machine components and in this regard, we will take ARC200 as an example as follow:

Proper installation of welding machine at site
- Installing earthing for the machine body and the workpiece.
- Input electricity to be with the right one including voltage rate (single phase, two phase or three phase).
- Right connection of electrode holder and return cable
All of these notes are as shown below:
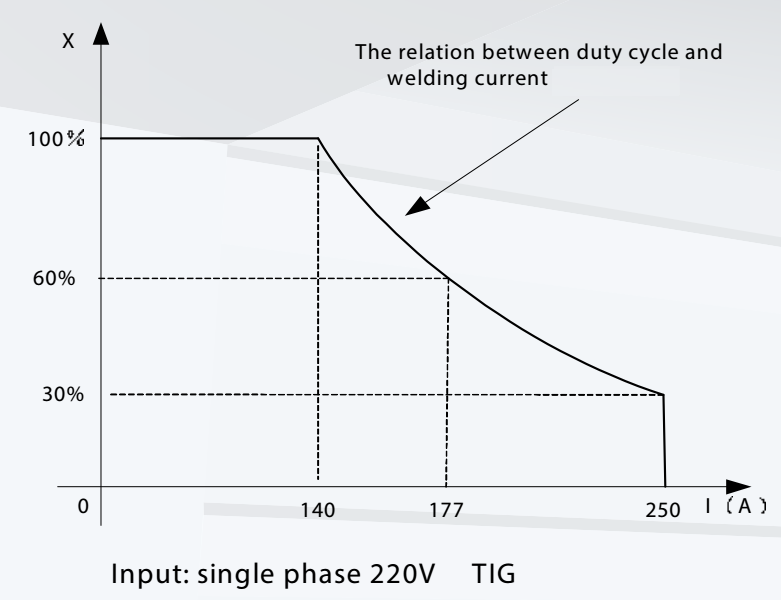
Machine duty cycle
Duty cycle is defined as the proportion of the time that a machine can work continuously within a certain time ( 10 minutes). For example: if we have a welder with dury cycle 60%, it means that this welder can work continuously on the rated current for 6 minutes out of 10 minutes but in case the welder is operated more than 6 minute, it will heat up and become over-heated which consequently will stop working due to the over heat protection in the machine. The below digram shows the relation between duty cycle (X) and welding current and as shown, the higher the welding current, the lower is the duty cycle, so if you are going to welding using higher currents , you should work contineously for lower time than the standard rated one.
Before going in deep in trouble shooting of the common welding mechines problems, let us go first to explain the main maintenance routine that should be followed.
Main maintenance routine
Each welding operator or welder owner shall maintain a strict maintenance routine to keep his welder in good condition and this routine includes daily, monthly quarter-yearly and yearly examination.
Examination Time
Check list and recommended actions
- Check panel knob and switch in the front and at the back
of arc welding machine are flexible and put correctly in place. If the switch is not flexible or cannot be put correctly in place, replace the damaged switch immediately by contacting the maintenance company.
- After turn-on power, watch/listen to that whether the arc welding machine has shaking, whistle calling or peculiar smell. If there is one of the above problems, find out the reason to get rid of. If you can't find out the reason, please contact the maintenance company.
- Check that Whether fan is damaged and is normal to rotate or control. If the fan is damaged, please change it immediately. If the fan does not rotate after the arc welding machine is over heated, observe that whether there is something blocked in the blade, if it is blocked, please get rid of, If the fan does not rotate after getting rid of the above problems, you can poke the blade by the rotation direction of fan. If the fan rotates normally, the start capacity should be replaced; If not, change the fan.
- Check cables and observe if there is any damage to fix it or replace the cable if it has severe damage that cannot be fixed properly to protect yourself from electricity shocks and not to cause any touch craters on the welded materials.
- Check your welding electrode holder, welding torch and earth clamp and if any of them is damaged, please replace it immediately.
- If you are going to work in a new workplace with your welder, please check the current phase supplied to your welder and be sure that your welder is connected to the right current phase whether single phase, two phase or three phase in addition to being sure of connecting your machine earth to the earth circuit of by using wire connecting machine body to copper rod dig in land beside the machine [normal procedure in new construction sites] to release the extra charges coming to the machine body.
- Check your welder from inside and by using an air blower try to clear out the dusts on radiator, main voltage transformer, inductance, IGBT module, the fast recover diode and PCB, etc.
- Check up the bolt in arc welding machine, if it is loose, please screw down it. If it is skid, please replace it. If it is rusty, please erase rust on the bolt to ensure it works well.
- Whether the actual current accords with the displaying value. If they do not agree, they should be regulated. The actual current value can be measured by the adjusted plier-type ampere meter.
- Measure the insulating impedance among the main circuit, PCB and case, If it is below 1MΩ, insulation is thought to be damaged and need to change, and need to change or strengthen insulation.
General problems and solutions
In the below table, we will mention some of the common issues of the welding machine that may come to your way during welding and with the proposed points to be checked to solve the problem:
Trouble description
Cause of the Trouble
Proposed Solutions
Welder is not starting
- Power circuit dead
- Broken power lead
- Wrong supply voltage
- Blown fuses
- Overload rely tripped
- Defective operating coil
- Open power switches
- Check the voltage and try to increase it.
- Repair power lead
- Check nameplate against supply whether one phase, two phase or three.
- Replace blown fuses
- Let the welder cool down and check the cause of overload.
- Replace the defective operating coil
- Close the power switches to be able to open them when connecting your welder.
Welder starts and blows fuse
- Fuses are too small
- Short circuit in motor connections
- The fuses should be 2-3 times the motor rated current.
- Check starter and motor leads for insulation from around and from each other.
Welder runs but stop after short time
- Welder is overloaded.
- Leads are too long or too narrow in cross section.
- The Power circuit is single-phased.
- Ventilation is blocked.
- The Ambient temperature is too high.
- You have to check the nameplate of the welder to know the duty cycle of the welder and consequently work accordingly to match it and not to work at overload currents for long time.
- You have to use suitable length and cross section area of the leads to match welding current as using too long leads and / or narrow cross section leads will result inheriting up of the leads and sometimes to the burn of leads.
- Check for one dead fuse or line.
- Check the welder ventilation blower and also the ventilation of the workplace.
- Try to work at lower loads when the ambient temperature exceeds 100 F (37.8 C).
Touching the welder gives shock
- The frame of the welder is not grounded well.
- You have to check the grounding of the welder's frame and fix it solidly.
The welder starts but not delivering the welding current
- Leads connections are loose whether to the earth or welding torch.
- Dirt, grounding field coils.
- Welding terminals are getting eclectic short.
- You have to check leads connections whether with the welder or with the electrode holder/torch and ground clamp and try to fix them well before starting welding.
- You have to clean well under the ground clamp and fix it solidly.
- The ground clamp is not properly fixed. So, you have to fix it well or replace the spring of the clamp with a strong one.
Welding arc is loud and spatters excessively
- The current setting is too high.
- Using wrong polarity that did not match the used welding process and the used electrode.
- Check your welding current setting on the machine and compare it with the measured one by using an ammeter.
- Check the polarity requirements of the used electrode and adjust your welder on it like for example if we are welding using E7018 stick electrode, so you have to adjust the electrode lead to be connected to the positive polarity of the machine and so on.
Welding is sluggish
- The current setting is too low.
- Poor connections.
- Cables are too long or have a small cross section area.
- Adjust your current setting on the suitable current range that matches the electrode/wire size.
- Check your connections whether to the electrode holder or to the ground clamp and fix them well to get the full current to the arc.
- Use the suitable length and cross section area of welding cables that match the maximum welding current, so you have to review the capacity of welding cables against the required length and cross section.
No wire feed or wrong wire feed direction in MIG welding
- Circuit breaker may be are tripped.
- Board fuses are blown.
- Wire feed motor electricity connections may not be ok.
- The reverse feed occurs when the nozzle and wire straightener are rotated about the axis of the gear box shaft.
If you have such problems, you have to contact the authorized maintenance person and he will the check the following to solve such issues:
- For circuit breaker, you have to re set them in case of tripping.
- If the fuses are blown, replace them.
- Check the electricity terminals for wire feed motor.
- Interchange the terminals of wire feed motor to reverse direction of feed.
The red lamp is on how ever the led screen shows normal and fan is working
- Over current protection
- Over temperature protection
- May be due to a problem with inverter circuit and leading arc board.
- Over input voltage
- Stop working for 5 minutes.
- Close 5 minutes and restart the machine.
- Check and measure the rectifications tubes one by one and replace the defected one.
- Use the right input.
Welding arc Problems related to welding machines
In addition to general welding machines problems that are mentioned in the previous table, there are some problems of arc in arc welding that may appear during work and may interrupt your welding process, so in the below table, we will include some of them with the recommended solutions:
Trouble description
Cause of the Trouble
Proposed Solutions
